Oswestry Works

Locomotive works diorama in 4mm

Welcome to Oswestry Works

P1080122

This past 12 months I’ve been researching and designing my first model for 25 years, a cut away diorama of Oswestry Locomotive Works.  This new site should hopefully give a picture of the motivation to build it, some new (to me at least!) techniques and technologies I’m learning and some of the history and personal recollections I’ve collated during the research.   The menu at the top of the page gives background on each aspect of the model.

Having recently resigned from my 9-5 IT job, I’ve moved back to Mid Wales and will be shortly starting a business in the world of 3D printing and 3D scanning, with a view to offering both as a service to modellers.  I hope to launch later in 2015, you can find out more about ‘Modelu‘ (Pronounced ‘Mo-Del-Ee‘ – Welsh for Modelling) here http://www.modelu3d.co.uk

Thanks for looking!

Oswestry Works 2017

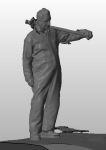
It has been some time since I looked at the plans for Oswestry Works, but with Modelu now more established I can start to put some time back into modelling.   I’ve picked up where I left off after meeting up with former Oswestry men, John Morris and John Dyke, who convinced me to model the machine shop.

Oswestry Works Machine Shop

The machine shop at Oswestry is now a antiques dealership, with many original features still visible including the large doors at the entrance to the inner works yard, original beams and rafters in the roof and all of the brickwork exposed.  I dropped in to get some photographs earlier in December and whilst wandering round the antique brick-a-brack  found a nice 1940’s suitcase.  It has made a nice addition to my body scanning wardrobe and still has an original GWR luggage label, marked Shrewsbury to Montgomery.

Researching the equipment in the machine shop has been helped by the book “Steam Workshops of the GWR“.  This shows the position of machine tools and fitters benches.   In the cut-away that I’ll be modelling, equipment included a boring machine, lathes and grinding machines, a wheel centre slotter and a screw cutting machine.

Many of these would have been provided by Sharp Stewart & Co who designed and fitted the works.  Grace’s Guide collection of Engineer magazine articles and http://www.lathes.oc.uk provide a number of images and drawings which will help recreate these.  Geoff Charles also captured some of these machines in use on his visit to the works in the 1950’s.

Operational / Demonstration Machine Shops

I made a few visits in 2014 to a number of machine shops around the country, including preserved examples at the STEAM museum and Manchester MOSI, both featuring belt driven machine tools.   Trips to the former GWR machine shop at the Vale of Rheidol shed in Aberystwyth and the machine shop at Didcot also helped give an idea of how a working machine shop looks and feels.

Designing the Machine Shop

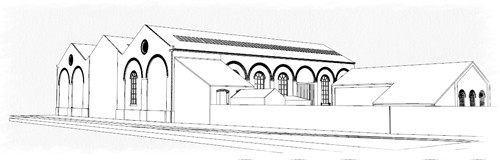
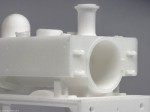
Designing the works structures uses a combination of 3D and 2D CAD.  In the first stage, Sketchup is used to create a 3D mock up using photos and measurements for reference.    This mock up has very limited detail, essentially just the cuts where windows, doors and any other features will be.   The material thickness of the MDF to be used is extruded in 3D, allowing the model to be built virtually.

Once the outer dimensions and features of a wall are completed, the wall can be viewed in 2D mode and exported as a DXF ready for brickwork to be added in Draftsight.  To make this operation easier, I use groups and components extensively in Sketchup, in order to isolate individual items.  Using the Outliner gives an overview of how the components and groups are nested and provides a quick way of hiding items.   Switching to parallel projection view mode, the element can be then viewed in 2D ready for exporting.  DXF export will export whatever is on the screen, so all other items must be hidden prior.

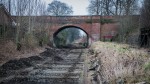
Works Sidings & Templot

In addition to the machine shop, I’ve also added a number of the works sidings and the goods thru road to the outside of the works.  The plan is to use this area for photographs of stock and to test out new Modelu components, including GWR concrete pot sleepers, Cambrian chairs and GWR slide chairs.  I used Templot for the first time to plan the track work out and found the DXF import feature of great use.  In Sketchup turning off the roof artwork group and switching to a plan 2D view allowed for a DXF export of the mock up to then be imported into Templot.

Templot Oswestry Works.JPG

Once the trackwork was completed, this could then be exported as a solid 3D DXF and imported back into Sketchup.

Next Steps

Geoff Taylor has been giving me some great advice on how to tackle this project.  Our first plan is to trial some painting techniques of the inner walls.  Looking at photographs shows they are heavily coated in many layers of paint with the brickwork barely visible.  I’m hoping to save time on laser cutting by using a paint/powder mix to coat the walls and give them a little texture.  If that goes well, then the walls of the main works buildings will be cut.  The outer yard buildings need finishing as does the works footbridge and the outer yard wall.  The roof will be removable so some thought will be given to producing the beams and rafters using brass rod to keep it strong.

That’s pretty much where I’m up to after blowing the dust off the plans over Christmas.  I’m hoping during 2017 to get a bit more balance and be a little stricter with myself regarding free time.  Working at home has its advantages but it has been very hard to switch off and lock up the Modelu workshop!

All the best for 2017 and thanks for looking,

Alan


Panniers at Penmaenpool

P1190945

Since starting Modelu full time back in April time for my own modelling has been very hard to find.  I’ve a High Level Pannier chassis about a third completed, bits of laser cut walls for the works here and there and a pile of stock waiting to be detailed and renumbered.  These last few weeks have seen me at five back to back exhibitions with the scanning equipment which has been something of a baptism of fire, but has helped bring things on at a much quicker pace.  I’m now almost on top of orders and will be looking ahead to widening the range of figures, adding architectural, lineside and loco detailing parts and looking at mass production options.

With my time being predominantly occupied with Modelu, it is always a very welcome break to be invited to Geoff Taylor’s for an operating session.  Yesterday Tom Foster was visiting Geoff and he brought along his growing collection of stock for his modular Bala-Blaenau Ffestiniog branch layout Cwm Prysor.   With Geoff’s scenics and Tom’s superbly weathered locomotives and kits it was a great opportunity to take some photographs.

P1190944

P1190941

P1190948

P1190952

74xx on shed at Penmaenpool

And I couldn’t resist a little photoshoping of these images into some of my favourite books as a young modeller!

GW Steam Doubleheaded

GW Steam in Wales

GW Branch Line Steam 2

Scrap Tank Test Build 8 – Casting Masters

I’m very pleased to share the results of printing Mark Tatlow’s intricate designs for his 4mm scale ‘Scrap Tank’ project. Thanks for the link Mark!

highland miscellany

The update on the Scrap Tank test build shows it looking like this:

Tank 1

The eagle eyed, and indeed the slightly less than eagle eyed, amongst you will notice that this is not a whole lot different to the last update, just a few fittings have been installed – basically the ones I could glean off other things; the safety valves/bonnet and smoke box from Lochgorm Models and the clack valves from Alan Gibson (but much cut down as they are really much too big).  I have not been able to fit any other castings because they don’t exist, so I have had to do some more work on these.

So it is back to the CAD machine to draw up a series of 3D masters; in the top view some piston rods/part of the cross head, rear sand boxes, clack valves (now the right size which is much much smaller)…

View original post 202 more words

The Apprentices

Researching Oswestry Works has taken me down all sorts of interesting avenues of investigation, from 15ft long Cambrian plans in the National Archives to well thumbed notebooks recording repairs and works undertaken.  A few months back a former Boilersmiths Apprentice John Dyke got in touch with me via RMWeb, he was researching his own and his family’s history and whilst looking for information on his time in the works and came across my project.   John had also been in touch with another former Oswestry man, John Morris, a Fitters Apprentice, and he arranged for the three of us to meet up a couple of weeks ago.

John Morris and myself taken by John Dyke

John Morris and myself taken by John Dyke

Being able to talk about the works with these enthusiastic gents was fantastic.  I could barely keep up with their stories and recollections so after an hour they agreed to me recording the meet up on my phone.  I’ve listened back many times already and it was a lovely experience to talk first hand about day to day life.  I took my collection of photographs and plans to help clarify some areas I wasn’t sure about – how were locos moved around the works? where were spares kept? how many people were needed to operate the traverser?  The list is endless and they were only too keen to help answer as many as I could remember.

Albert Jones (L) and John Morris (R) working on the cylinders of a 14xx in Oswestry Works

Albert Jones (L) and John Morris (R) working on the cylinders of a 14xx in Oswestry Works

What originally set me on this path of 3D scanning was seeing a collection of photographs taken by Geoff Charles in the early 1950’s.  The collection is kept at the National Library of Wales and they have very kindly given me permission to share some of the photographs here.  What is different about his photos is that they are of the workmen of the works, forming a small part of a vast body of Geoff’s collection capturing every day life in Wales during and immediately after the Second World War.  These photos brought the works to life and inspired the idea behind 3D scanning people for highly realistic, naturally posed figures.  Better still – scanning the actual people who worked there…!

Left to Right: Arthur Kynaston (Boilersmith), Don 'Wacker' Rees  (Boilersmith apprentice), Tommy Pritchard (Boilersmith Chargeman), Jack  'Kinnerly', Jack Whitby (loco fitter)

Left to Right: Arthur Kynaston (Boilersmith), Don ‘Wacker’ Rees (Boilersmith apprentice), Tommy Pritchard (Boilersmith Chargeman), Jack ‘Kinnerly’, Jack Whitby (loco fitter)

Talking with John Dyke and John Morris has answered a lot of questions I had about the works and how to represent it as a model. It’s also given me much more to think on – small details like where the fitters used to keep their coats, warming them on the heating pipes during the winters; where the erecting shop and boiler shop fitters respectively used to have their snap; the flow of work from the erecting shop and boiler shop to the machine shop and back; how components were taken to the bosh for cleaning; how some works were carried out in the back yard if the weather was nice! And much more. The most resounding feedback from both John’s however was that I must model the Machine shop, it was integral to the works and the model wouldn’t be complete without it!  Thankfully Geoff Charles photographed many of the men who worked in the Machine shop and there is a well detailed plan of equipment in Steam Workshops of the Great Western Railway by Ken Gibbs.

Thomas Marshall (boilershop labourer) cleaning out piston rigngs and Dai 'Swingboat' Wynne (fitters mate) scraping carbon deposits from a front valve chest cover

Walter Ancell (fitters mate) cleaning out piston rigngs and Dai ‘Swingboat’ Wynne (fitters mate) scraping carbon deposits from a front valve chest cover, taken in the traverser shed.  Note the primitive sinks behind!

For the time being however there won’t be much progression on the works model, other than the completion of a few locomotive detailing projects (9000, 9005, 9018 and 7819).  Most of my time now is taken with developing Modelu and its potential, including planning the first stage for a range of highly realistic figures.  It’s likely I’ll start out with loco crews and shed staff as they have quite a wide appeal.  In addition to 3D scanning I’ve had a steady stream of some interesting commissions, from terraced house chimneys to point rodding stools!   More to come on that front soon.

The men of Oswestry Locomotive Works Approx 1954

All photos reproduced with the kind permission of The National Library of Wales.  All loco works names provided by John Morris.

Modelu first steps

Missenden Abbey 3D Scanning Demonstration Sample Prints

It’s been a hectic time since the Missenden Spring weekend with not much time for modelling unfortunately.  On March 31st I officially finished work at my IT job and in effect officially started working self employed with Modelu.  The rest of March was spent finishing the garage/workshop conversion then April so far has been getting down to business working on the scans taken at Missenden Abbey.   I owe the Missenden organisers a huge amount, having the opportunity to demonstrate there has really helping bring things on a pace.

The scans were all edited in Netfabb, having anomalies removed where the person may have moved slightly or the scanner picked up the ceiling or floor.  Printing wise, I’d like to say everything has gone smoothly after using the printer for a few months, but there is always a bit of room for user error to mucky the waters…! After a few days of shenanigans I’ve been getting consistently improving prints, helped by input from jewellers who are the predominant users of the B9 Creator.

Missenden Abbey 3D Scanning Demonstration Sample Prints

I’m really pleased with how these have come out, the printer continues to exceed my expectations – but it does demand some serious time and energy, there is no way I could have got this far with it if I was still working full time.   Scanning takes some patience and imagination; its quite easy to fall into the trap of imagining yourself as the model instead of the real person, posing in ways which are either unrealistic or overemphasised.  There is a definite knack to it and it will come with practice.

These little cameo’s were fun to put together – this is exactly the kind of thing I want to do for Oswestry Works and what ultimately inspired me down this path in the first place.  Being able to have scanned figures of some of the men that worked there and being able to share and recreate some of their memories really appeals to me.  On that note, I’m meeting two former Oswestry men towards the end of the month, one a former boilersmith apprentice and the other a fitters apprentice.  I’m really looking forward to listening to their experiences, it will give the works project a real boost.  That’s if I can find time to work on it!

I did make time this evening to finish off No.9000 however, all its needed was numbering and allocating, so with some help from a fellow Cambrian modeller, Alan Jones I got some new plates.  He sells etched plates and yesterday I put my last minute order in, hoping to get 9000 finished before the weekend.  Alan kindly sorted my order out and got it in the post first class and the numbers arrived today.  Check out his website if you need any GWR and absorbed etched plates, he also has lots of plans to cater for Welsh modelling, Cambrian Railways in particular.  No.9000 ran with a Dean tender so it’s not quite finished yet, it also needs weathering at some point.  Smokebox plate is Pacific Models again and 89C shed code is from the Model Masters range.

P1190180

Tomorrow I’m off to ScaleFour North for the weekend, I’ve been invited to demonstrate 3D scanning so I’ll be there both days with all the kit.  If you want to have a go yourself, or see the samples, or just say hello, you can find me next to the Missenden Abbey stand, opposite Mark Tatlow’s superb Portchullin.

Scalefour North 2015

Saturday 18th April 2015 – 10:00 – 17:00
Sunday 19th April 2015 – 10:00 – 16:00

Queen Elizabeth Grammar School
154 Northgate
Wakefield
WF1 3QX

Admission £7.00
Scalefour Society members £6.00

P1190175

I really must spend some time painting figures…

Pannier Capers & the 64xx

Albion Yard

Bachmann 64xx 31-636 Bachmann 64xx
31-636

In amongst the flurry of Hornbys releases over the first quarter Bachmann released their latest Great Western design, Colletts 64xx 0-6-0T Pannier. These were a derivative of the earlier 54xx, very much the same engine but with larger diameter wheels. Collett took the 54xx design and in essence reduced the driving wheel size from 5ft 2” to 4ft 7 ½” and changed a few other bits such as the cylinders and their dimensions. There were a few other dimensional differences, but as we’re not looking at the 54xx, the differences are somewhat moot.

Bachmann 64xx 31-635 Bachmann 64xx 31-635

A pair of 64xx’s have arrived, and I’ve been giving them a coat of looking at as Roy Jackson would say. Bachmann has chosen sensibly to do versions of the main batch produced with the detail associated with that group of locomotives. Color finish on them is excellent and I chose…

View original post 1,033 more words

Mawddach interlude

The George Hotel, Penmaenpool

The George Hotel, Penmaenpool

The Mawddach estuary is a stunning area of Wales where Mountain, Sand and Sea meet as the old BR WR posters used to proclaim.  On a wet and windy day in March the nearest you can get to the last of halcyon days on the Western Region is time spent on Geoff Taylor’s Barmouth Junction layout.  I’m very fortunate in that Geoff is practically a neighbour, living a few miles away in another village.  He kindly invited me to an operating session and I spent a relaxing day mostly at Penmaenpool.

The Station, Penmaenpool

The Station, Penmaenpool

The standard of modelling as you’d expect is unsurpassed.  It feels as close as you can get to actually being there, the tone and texture of the landscape blends together with the railway beautifully.  Operating is relaxed, interspersed with short bursts of activity, where trains might be passing in the loop at Penmaenpool, or on rare occasions multiple services arriving at Barmouth Junction whilst a light engine waits to turn on the triangle.

A quiet moment at Barmouth Junction

A quiet moment at Barmouth Junction

Getting down to eye level gives a very rewarding view, with or without a passing service in the frame.  I feel like I’ve been to a gala weekend which I’m sure will sound a little over the top, but it is a real pleasure to see the layout in action with operators on the fiddle yards of Machynlleth, Barmouth and Ruabon, at the yard at Dolgelley or the branch and main platforms at Barmouth Junction.

GWR 7800 Class Manor No.7821 'Ditcheat Manor' prepares to depart Penmaenpool with a stopping service for Birkenhead

GWR 7800 Class Manor No.7821 ‘Ditcheat Manor’ prepares to depart Penmaenpool with a service for Birkenhead

Although there is always plenty going on, there is enough time to sit back and take it all in, get the camera out and transport yourself there.  I transported myself there a little too deeply on occasions and would have a few words thrown my way to pay attention!  Each time I see the layout I have a great urge to get on the train and go there, to take a walk across Barmouth bridge or to follow the old line from Morfa Mawddach to Dolgellau.  As I type this however the rain is lashing so hard against the house that the windows are rattling, so I’ll turn the heater up another notch and take another look at the layout photos with a cuppa!  So in the mean time, I hope you enjoy the photos of my weekend break on the Mawddach estuary.

GWR 7800 Manor Class No.7800 'Torquay Manor' departs Penmaenpool after dropping of loco coal for the shed

GWR 7800 Manor Class No.7800 ‘Torquay Manor’ departs Penmaenpool after dropping of loco coal for the shed

BR Standard Class 3 No.82029 enters Penmaenpool with the shuttle service from Dolgelley to Barmouth.

BR Standard Class 3 No.82029 enters Penmaenpool with the shuttle service from Dolgelley to Barmouth

GWR 2251 Class No.2260 ready to depart with a stopping service for Wrexham

GWR 2251 Class No.2260 ready to depart with a stopping service for Wrexham

Overall view of Penmaenpool with GWR 2251 Class No.2260 on a stopping service

Overall view of Penmaenpool with GWR 2251 Class No.2260 on a stopping service

Between Penmaenpool and Barmouth Junction, the line crosses one of the many tributaries of the estuary

Between Penmaenpool and Barmouth Junction, the line crosses one of the many tributaries of the estuary

Missenden Abbey Spring Weekend

Last weekend of March 6-8th was my second experience at Missenden Abbey modellers weekend.  Last year at the Autumn weekend I’d registered on the 3D Printing course led by Bob Gledhill, an experience which played a large part in my decision to go self employed in 2015 and start Modelu.  This time round however I was there to learn about loco building, in particular chassis building.  I’d bought a High Level 57xx chassis at Scaleforum North last year which I’d not had the courage to start, so that seemed like a good project for Missenden.  There are probably simpler first kits to attempt – I’d also purchased the Comet Dean Goods, but as the instructions were so comprehensive I opted for the HL Pannier, backed up by the knowledge that help would be on hand if I got into difficulties.

Missenden Abbey Loco and Kit Construction Course

With guidance and sound advice from Paul Willis and tutors Tony Gee and Tim Watson I got as far as constructing the frames, laminating the articulated connecting rods and constructing the horn blocks.  Having never constructed a chassis before I needed some assistance interpreting some of the instructions, where experienced builders would already know which stage for example to solder the spaces and frames.  Other than that, the build went well without any major malfunctions!  So far so good and I’m aiming to finish the chassis for Scaleforum North in April.

High Level Pannier Chassis build

For anyone thinking about going to a Missenden weekend I can highly recommend them, not just for the modelling and skills, but for the people you meet, the friends you make and the banter you have.  It’s worked well for me saving a complex kit or a particular new skill for a Missenden weekend where so much help is on hand, not just from the experienced tutors but from other modellers as well.  I’ve learnt much about tools, techniques and tips, all which should help further my modelling skills now I’m back home.  What also makes the weekends so enjoyable is the time spent at dinner and in the bar, where you get to find out what others have been working on, maybe track building, weathering, lining, DCC, sounds etc or just having a chinwag and a laugh – so much is going on that the weekends fly by.  Looking back at the first post on this blog, I’d just come back from the Autumn Missenden.  That weekend gave me a big modelling boost as I’m sure the Spring one will.

As well as tackling the Pannier, David Brandreth and Tim Shackleton kindly invited me to demonstrate 3D scanning on the Saturday evening, in particular scanning people.  This is something I’ve been researching and experimenting with for producing highly detailed and highly realistic figures.  Attendees on the course were invited to bring along props and clothing suitable for the 1930’s-1950’s period, to be scanned in various poses

Missenden Abbey 3D Scanning Demonstration

A good number of people rose to the challenge, three people bringing boiler suits, firing shovels and grease tops (two of which were volunteer drivers on preservation lines), another bringing a pick axe to be depicted as his grandfather who worked in a permanent way gang.  Tim Shackleton donned a cloth cap and was scanned in a ‘waiting for the pub to open on a cold morning’ pose.  It was great fun and I learnt a lot about the process and where it needs streamlining.

The scanning setup uses a Cubify Sense scanner, which is a handheld laser scanner for the consumer market. Retailing around £300 it is usable for low resolution scanning of people or mid-large size household objects.  Anything requiring greater fidelity or accuracy requires a more advanced scanner, with quite a hike in cost, such as the Artec Eva (approx £10,000) or for smaller subjects the NextEngine desktop scanner (around £3000).   Using the Sense scanner does have some operational drawbacks – the scanner is wired to a laptop/pc, which means extension cables must be used.  Care has to taken not to get tangled up in cables!

The scanner captures 1 metre cubed in 3D space, so any background outside of this box is ignored.  In some cases areas of the floor or ceiling maybe captured but these can be easily removed later in a 3D package such as Netfabb or Meshlab.  Other issues can occur if the scanner is moved too fast, or if the laptop/PC isn’t powerful enough.  For trouble-free scanning a powerful computer with a dedicated graphics card such as a high-end Nvidia is needed.  With a steady hand and a patient person being scanned, acceptable results can be produced with the Sense scanner once they have been scaled down to the required scale.   I’ve experimented so far with 2mm, 4mm and 7mm figures.

Modelu Test Scans

It’s still early days but I’ll be offering this as a service in the future, for modellers who’d like to feature themselves in their layouts, driving a loco, spotting on the end of a platform, or watching the world go by in some sleepy corner of the layout – the possibilities are seemingly endless! The immediate priority though is to push on with converting the garage into a workshop with proper lighting and enough power sockets for all the paraphernalia associated with 3D printing.   Then I’ll have a proper working environment to see where this new adventure leads.

The Workhorses of Oswestry Yard

The Cambrian system featured relatively few Panniers compared to other corners of the GWR, the exception being Oswestry.   57xx, 74xx and 54xx classes were represented over the years, but the most numerous were the 16xx class.  These little Hawksworth engines were not introduced until 1949 but were pure GWR design, specifically built for light branch work and shunting.  At Oswestry they were employed extensively shunting in the yards, as station pilots or on the branches around the Oswestry area.   Oswestry shed had 10 class members on its books at various times between 1949 and 1962.  Of these, 1602, 1603, 1604 and 1636 had long associations, 1604 spending its whole life of 11 years at Oswestry.  1604 and 1636 are two that I’d like to model in Oswestry Works.

Tom Wright's 16xx and a NuCast 16xx

A while back I picked up a built NuCast 16xx with a view to improving the detailing and adding it to the works roster.  Other than replace it’s incorrect 57xx chimney with a 3D printed one its not had any other attention since I bought it.  In the mean time, Tom Wright has produced a very nice 3D printed 16xx, including frames available via Shapeways.   The design and build of the 3D model is chronicled here on RMWeb.  Tom has kindly modified his original design to exclude some details which I’d prefer to add myself, such as sprung buffers, etched lamp irons and the like.    I ordered it from Shapeway’s on the 17th Feb and today it arrived.

Tom Wright's 16xx

Tom Wright's 16xx

The model includes a body shell, OO gauge spaced frames with nem pockets and a separate smoke box door and roof.  It has a nice solid feel, the lines are crisp and the body shape is captured perfectly – thanks to Tom’s design skills.  The wall thickness is good, the cab sides in particular look better than some RTR offerings.   The main benefit over the B9C is being able to print the loco in one piece, whereas on the B9C due to the restrictions on the build volume at 30 microns, I’d have to print the loco in parts.  However, when it comes to the surface finish the grainy/frosted look needs attention.  The whole body is going to need sanding down, fine for the cab and tank sides but a challenge for anywhere else.  Finer details such as the boiler fittings and smoke box door will be easier to remove and replace with prints from the B9C.

The key point though is that the design itself is great and it will be another nice detailing project to get stuck into.  It’s the material that’s the problem (for me at least!) unfortunately, though I’m confident with some sanding and fine detailed parts it will really lift the model.  It will get the same treatment at 5726 – handrails, boiler fittings, buffer beam detail, pipework, scratch built pull rods and lamp irons etc and will be out shopped as 89A’s No.1604.

It will have to wait a little while though as I’m currently converting our garage into a workshop, I’ve had too many days in there with the temperature hovering just over freezing whilst I’ve been working on the printer!  With the garage/workshop finished in a few weeks time I’ll be ready to get the new 3D business going in earnest.  I’ve still been working my notice so I’ve not as yet been able to devote a lot time into getting things off the ground, but come the end of March 3D design, scanning and printing will become my day job! It’s a bit daunting/exciting/terrifying, but so far so good.  There should also be a surge in progress on the actual building of Oswestry Works in a few weeks, finally…

Being back in Wales now its been great to have Oswestry only an hour away. A couple of weeks ago I had my first experience volunteering with the Cambrian Heritage Railway, the days task being clearing out the cattle pens near the Coney Green.  About 12 of us spent the day tackling the undergrowth as well as clearing old sleepers from the mainline.  Back breaking work but great fun and a nice change to be working on the real thing!

Oswestry Cattle Pens

No.9000 – Back to Black

Considering the benefits 3D printing gives when tackling something like the top feed and sandboxes, there is still a good deal of traditional modelling required to integrate them into the model.  The sandbox pull rods have given me a few hours of amusement trying to solder them (mental note: now might be a good time to look into etching some!); the casing for the top feed pipe, where it runs up the side of the boiler, was equally challenging.  I’d originally tried used masking tape to replicate the thin metal that encases the pipe, but I didn’t get very good results.  Having some time away from the problem was what I needed and this morning I realised that tin foil would be perfect for the job.

Shaping tin foil around the top feed pipe

2 hours later I was still battling with the umpteenth strip of tin foil, having tried and failed with 3 different methods for accurately shaping it around the wire.  The final method which worked well enough was to bend some wire around another Dukedog boiler, take an inch long strip of tin foil about 2.5mm wide, tape one end to the boiler/wire and then smooth the tin foil down the wire making sure it shaped to the wire.   Then using a flattened end of a cocktail stick you can tease the tinfoil gentle into the wire.  Even at that stage the process is fraught with danger, as slightly too much pressure with the cocktail stick tears the tin foil.

Shaping tin foil around the top feed pipe

With that fiddly task completed I turned attention to the front of the loco.  No.9000 was one of a few class members that had a lamp iron on the smokebox door, another nice fiddly task to challenge me.  The lamp iron on the smokebox door would need to be quite fine so as not to jar with its surroundings, so I decided to use Shawplan Extreme Etchings Lamp Brackets as these are a lot finer than the Mainly Trains etch.   Iain Rice’s Etched Loco Construction was my guide for folding the etch into shape, not as tricky as I thought but still a testing task with the Hold’n’Fold.   To keep things the same I replaced the other lamp irons and for variation fitted a new smoke box dart.

P1180302

With those jobs finished the last task tonight was to mask and then coat with Halfords black primer.  This wasn’t quite as straight forward as with the Pannier as the open cab has fantastic detail which needed preserving.  A few layers of Tamiya masking tape did the job but for me it still takes a bit of a leap of faith when using maskol.  This time however I’m completely sold on it, it worked great used directly on the cab windows and peeled off easily after starting with a cocktail stick.

P1180304 P1180305

Of course once the primer is on then the niggles start to show.  The top feed has an unsightly gap where it meets the boiler that I’d forgot to tackle, I think I’ll have to try some modelling putty and another coat of primer.  Anyways, that’s it for now, I’m waiting on the numbers still so No.9000 will go back into the queue.  I think it might now be time to blow the dust of the High Level Chassis for No.5726! I’m booked onto the Loco building course at Missenden in March, so I think making a start on the kit now would be good and I’ll take a Comet Manor and Mogul chassis’ to Missenden as I imagine they will be quite a lot harder.

P1180307 P1180308 P1180310